 TRSI Sound Monitor v1.1
Written in 2004 by Franck "hitchhikr" Charlet
|
The concept
Getting started
The instruments
The sequences
The positions
Keyboard Shortcuts
The
concept
TRSI Sound Monitor is a synthetizer/sequencer, it's based on real time software rendering of combinated basic waveforms
played in "sequences" (that can be regarded as measures) which are ordered/assembled in "positions" through the 8 tracks
available and played at a given tempo to finally give a score/song.
Getting
started
Note: Some knowledges about audio synthetis is required prior to using the monitor, be sure to check some tutorials
that can be found on the web before starting.
Creating the instruments
Creating the sequences
Creating the score
Creating the instruments
The first thing that must be created are the instruments:
Click on the upper right gadget labeled "New" (or use Ctrl+I). A new instrument will be created and a first waveform
line will appear in the instruments area:
 The blinking caret is pointing on the operator column (labelled "O") that will be used to combinate this waveform line
with the other ones (if the user decides to create some more), available operators are the four base operations: + - * /
Since we're on the first line, the initial value is always 0 (zero) so it wouldn't make sense to use a multiplication
or a division here, we'll use an addition.
The second column (labelled "Wf") is related to the waveform we'll use in this waveform line.
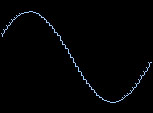
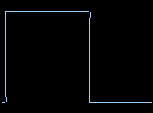
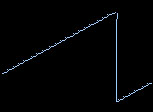
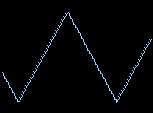
Available waveforms types are and look (roughly) like:
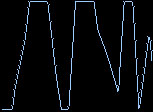
| 1: Sin wave | 2: Square wave | 3: Saw wave |
 |
 |  |
| 4: Triangle wave | 5: Random noise | |
 |
 | |
All are tuned after the american standard (A4 = 440Hz).
The number 6 is used together with the phase shift to apply an absolute value to the accumulator
and is mainly useful to obtain a saturation/calibration effect (a distortion effect is also available
in sequences effects).
Check some papers to understand when and how these differents waveforms should be used
(but keep in mind that it will only be a general guideline).
The next columns are the ADSR (Attack/Decay/Sustain/Release)
of the selected waveform and determine the "dynamic" of the waveform.
They are ordered as follow:
Attack final Volume/Attack ramping
Decay final Volume/Decay ramping
Sustain final Volume/Sustain ramping
Release final Volume/Release ramping
If we try to play it as it was created previously we'll just hear nothing, that's because the ADSR haven't been set yet.
All values in TSM are represented in hexadecimal notation.
All volumes are expressed in percentages.
(64 in hexadecimal means 100 in decimal which is in reality 100% of a normalized volume between 0.0 and 1.0
(so, if we want a volume lowered at 50% we will use 32).
ADSR ramping are also expressed in hexadecimal and go from 0 to ffff (65535).
We gonna start with a simple one:
 We set the Attack volume to the maximum (64) and the attack ramping to the minimum enabling value (1),
if we play this instrument we'll hear a flat sine wave going on at the same volume forever and ever.
Now we will enable the Decay ramping by giving it a value of 5000 and a volume of 0:
 The synthetizer will proceed these value as:
Ramp to volume 64 (100%) (always starting from 0) in 1 samples then ramp to volume 0 (0%) in 5000 samples.
We left the Sustain/Release disabled but the principle is exactly the same, just know that the Release can't
be used the Sustain isn't already enabled, the total number of samples per instrument is 3fffc (ffff*4)
which is approx 6-7 seconds of effective control given to the user.
This one will sound more like a bell.
Clicking on the "Add" gadget (or using Ctrl+N shortcut) will create another waveform line
(an instrument can hold up to 256 waveforms lines):
 We will set this one to substract another sin wave, a phase shift (which is a value to apply to the base frequencies) of 50
and to modify the ADSR slightly:
 Played at middle frequencies (around C-4) this will sound more like a flute.
Being comfortable with the instruments editor by exploring the range of it's possibilities (which are numerous)
is a real plus, but keep in mind that the shape of the instruments produced with it will probably be modified while
editing the sequences via the available filters.
Creating the sequences
A sequence is constitued of notes/instruments numbers and various effects used to modify the shape of these instruments
and the behaviour of the score replaying (for example to change the tempo).
(See the detailed description of each of the sequences editor elements here).
Creating the score
To actually create a score with the positions editor is quite easy.
Just add the required number of positions ("Add." or "Insert" gadgets) and fill the sequences columns with the according numbers,
eventually with a positive or negative transpose value (expressed in semitones) and eventually a global volume
in which the selected sequence (and the next ones if you don't specify a volume for this track again) will be replayed.
A Position is composed of 8 tracks each constitued with a sequence number, a semitone transpose value,
a volume value and looks like this:
 Don't forget to save your work often !
The
instruments
Current instrument number
|
| Total number of instruments (Read only)
| |
| | Play this instrument (ESC to stop)
| | |
| | | Replay note
| | | |
| | | | Goto previous intrument
| | | | |
| | | | | Goto next instrument
| | | | | |
| | | | | |
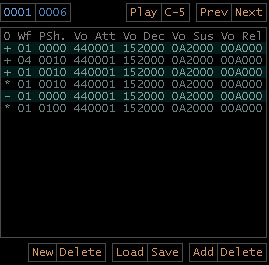 | | | | | |
| | | | | Delete current datas
| | | | |
| | | | Add datas to accumulator
| | | |
| | | Save this intrument
| | |
| | Load a new intrument
| |
| Delete this instrument
|
Create new intrument
|
Operator
|
| Waveform
| |
| | Phase shift
| | |
| | | Attack volume ramping
| | | |
| | | | Attack duration
| | | | |
| | | | | Decay volume ramping
| | | | | |
| | | | | | Decay duration
| | | | | | |
| | | | | | | Sustain volume ramping
| | | | | | | |
| | | | | | | | Sustain duration
| | | | | | | | |
| | | | | | | | | Release volume rampign
| | | | | | | | | |
| | | | | | | | | | Release duration
| | | | | | | | | | |
| | | | | | | | | | |
 Operator
+ - * / performed on previous datas line
with current datas on line
(the value is 0 at before the first line)
Waveform
1 = Sin
2 = Square
3 = Saw
4 = Random
5 = Constant value (specified in phase shift)
6 = Triangle
Phase shift
Value to add/sub from the frequency of the intrument.
(If waveform is 5 then the phase shift is only used
as the specified constant value).
Note
The ADSR durations are cumulatives giving a total duration
of 0x3fffc (0xffff * 4). All instruments loop, so non-looping
ones are obtained by setting one of the ADSR volume ramping
to 0 (a duration of zero in any of the ADSR durations stops
the process and loop the instrument on the latest known volume).
|
The
sequences
Current sequence number
|
| Total number of sequences (Read only)
| |
| | Base octave
| | |
| | | Goto previous sequence
| | | |
| | | | Goto next sequence
| | | | |
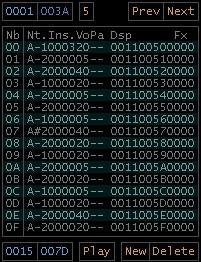 | | | | |
| | | | Delete this sequence
| | | |
| | | Create a new sequence
| | |
| | Play this sequence (ESC to stop)
| |
| Misc. effects tempo
|
Global tempo
Current sequence number
From 0x0001 to total number of sequences
Total number of sequences
From 0x0001 to 0xffff (65535)
Base octave
From 0 to 8 (Click to modify or use F1/F2 keys)
Misc. Tempo
The tempo used for the Misc. FX speed.
|
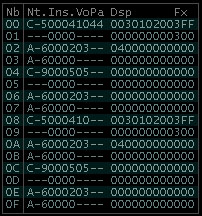
Order position
|
| Note (C-0 to C-9)
| |
| | Instrument number
| | |
| | | Volume (0 to 64)
| | | |
| | | | Panning (0 = left / 64 = right)
| | | | |
| | | | | DSP mask
| | | | | |
| | | | | | DSP fx number
| | | | | | |
| | | | | | |DSP fx Parameters
| | | | | | ||
| | | | | | || Misc. fx
| | | | | | || |
| | | | | | || |Misc. fx parameters
| | | | | | || ||
| | | | | | || ||
 Note
From C-0 to B-9 (10 octaves)
Instruments number
From 0x0001 to 0xffff (65535)
Note: Using instrument number 0 with a note
will simply re-use latest known instrument
Volume
From 0 (left) to 0x64 (right) (32 = center)
(0 = no panning = center)
DSP mask
Binary number from 0 to 0x3f (expressed as binary 111111)
Where: 100000 (32) (0x20) shutdown DSP fx 6 (Vowels formant)
Note
From C-0 to B-9 (10 octaves)
Instruments number
From 0x0001 to 0xffff (65535)
Note: Using instrument number 0 with a note
will simply re-use latest known instrument
Volume
From 0 (left) to 0x64 (right) (32 = center)
(0 = no panning = center)
DSP mask
Binary number from 0 to 0x3f (expressed as binary 111111)
Where: 100000 (32) (0x20) shutdown DSP fx 6 (Vowels formant)
010000 (16) (0x10) shutdown DSP fx 5 (Distortion)
001000 (8) (0x08) shutdown DSP fx 4 (Delay)
000100 (4) (0x04) shutdown DSP fx 3 (VCF pass filter)
000010 (2) (0x02) shutdown DSP fx 2 (Hi pass filter)
000001 (1) (0x01) shutdown DSP fx 1 (Lo pass filter)
So: 111111 (63) (0x3f) shutdown DSP fxs 1,2,3,4,5 and 6
DSP FX
Lo pass filter (1)
Parameter 1: Resolution.
Parameter 2+3: Cut off.
Hi pass filter (2)
Parameter 1: Resolution.
Parameter 2+3: Cut off.
VCF pass filter (3)
Parameter 1: Resolution.
Parameter 2+3: Cut off.
Delay (4)
Parameter 1: Distance.
Parameter 2: Feedback.
Parameter 3: Panning.
Distortion (5)
Parameter 1: [Not used]
Parameter 2+3: Distortion amount.
Vowels (de)formant (6)
Parameter 1: 0: none
1: A
2: E
3: I
4: O
5: U
Parameter 2+3: [Not used]
Note: Once turned on a filter will process datas forever and ever
on the track it has been used until turned off again.
Using a filter with parameters value set to zero have no
effect except for the delay's panning (extreme left).
Misc. FX
Arpeggio (1)
Parameter 1: Semitone shift 1
Parameter 2: Semitone shift 2
Pitch bend up (2)
Parameter: Pitch speed
Pitch bend down (3)
Parameter: Pitch speed
Vibrato (4)
Parameter 1: Speed
Parameter 2: Depth
Volume slide up (5)
Parameter: Slide speed
Volume slide down (6)
Parameter: Slide speed
Set tempo (7)
Parameter: New tempo
Set Misc. FX tempo (8)
Parameter: New tempo
Set global volume (9)
Parameter: New global volume
Tone portamento (A)
Parameter 1: [Note field]
Parameter 2: Speed
External program control (B)
Parameter: From 0 to ff (255)
(Passed to user defined function).
Note: The monitor will re-use the last entered value
for effects 1 to 6 (included) if parameter(s)
is/are omitted (like in protracker).
|
The
positions
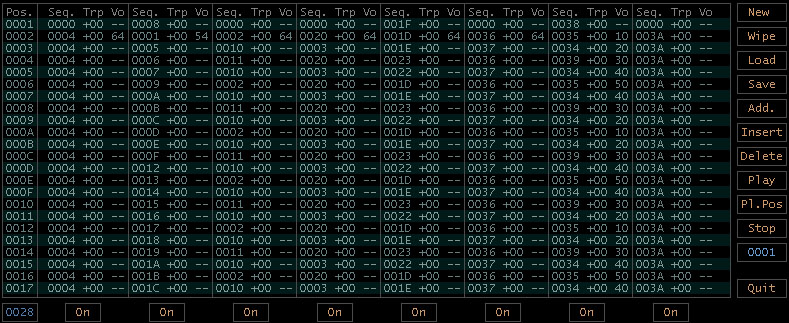 | | | | | | | | |
| +---------+----------+---------+----------+---------+----------+----------+
| Turn tracks on/off (these states aren't saved into the modules)
|
Total number of positions (Read only)
New Erase all datas.
Wipe Remove all unused/duplicate instruments & sequences from the song.
Load Load new module.
Save Save current datas as module.
Add. Add a position.
Insert Insert a position at current location.
Delete Delete current position.
Play Play song (ESC to stop).
Pl.Pos Play song from current position.
Stop Stop replay.
Restart position Ordinal position from where the song should restart (from 1 to 0xffff (65535)).
Quit Quit TSM.
|
Position number (From 0x0001 to 0xffff (65535))
|
| Sequence number (From 0x0001 to 0xffff (65535))
| |
| | Transpose sequence by # semitone(s)
| | |
| | | Global volume to use to replay the sequence (None = use last known volume).
| | | |
| | | |

|
Keyboard shortcuts
Global
Ctrl+Left: Go to previous sequence.
Ctrl+Right: Go to next sequence.
Shift+Left: Go to previous instrument.
Shift+Right: Go to next instrument.
F1: Increment base octave.
F2: Decrement base octave.
TAB or Shift+TAB: Switch between Instruments/Sequences and Positions.
F5: Play current instrument.
F6: Play current sequence.
F7: Play song.
F8: Play song from caret position.
ESC: Stop any playing.
Ctrl+I: Create a new instrument.
Ctrl+O: Load a module.
Ctrl+S: Save a module.
Ctrl+F1 to Ctrl+F8: Switch tracks on/off.
Instruments editor shortcuts
Ctrl+N: Create a new waveform.
Ctrl+D: Delete current waveform.
Sequences editor shortcuts
Home: Go to note column.
End: Go to Misc. FX datas column.
Shift+Insert: Insert empty row.
Shift+Delete: Delete the current row.
Ctrl+Home: Go to row 0.
Ctrl+End: Go to row 0xf.
Ctrl+Delete: on a note will not erase the instrument number.
F3: Increment notes of selected instrument by one semitone.
F4: Decrement notes of selected instrument by one semitone.
Shift+F3: Increment octaves of selected instrument by one.
Shift+F4: Decrement octaves of selected instrument by one.
Ctrl+X: Copy datas into clipboard and clear sequence.
Ctrl+C: Copy datas into clipboard.
Ctrl+V: Paste datas from clipboard into sequence.
Ctrl+N: Create a new sequence.
Ctrl+D: Delete current sequence.
Ctrl+K: Delete all current column's datas starting from the caret position.
Ctrl+Shift+K: Delete all sequences's datas starting from the caret position.
Ctrl+L: Delete current row of datas located below and at the right of the caret.
Double click: On instruments column will select the corresponding one in instruments editor.
Positions editor shortcuts
Shift+Insert: Insert an empty row in current track.
Shift+Delete: Delete the current row in current track.
Ctrl+Insert: Insert a new position (all tracks).
Ctrl+Delete: Delete the current position (all tracks).
Ctrl+K: Delete all current column's datas starting from the caret position (either: note, transpose OR volume).
Ctrl+Shift+K: Delete all track's datas starting from the caret position (note, transpose AND volume).
Ctrl+L: Delete current row of datas located below and at the right of the caret.
Double click: On sequences column will select the corresponding one in sequences editor.
TRSI Sound Monitor v1.1
Written in 2004 by Franck "hitchhikr" Charlet
 The blinking caret is pointing on the operator column (labelled "O") that will be used to combinate this waveform line
with the other ones (if the user decides to create some more), available operators are the four base operations: + - * /
Since we're on the first line, the initial value is always 0 (zero) so it wouldn't make sense to use a multiplication
or a division here, we'll use an addition.
The second column (labelled "Wf") is related to the waveform we'll use in this waveform line.
Available waveforms types are and look (roughly) like:
